分享 ShellCrash 搭载 mihomo 内核采用 geodata 方案的一套配置
此方案适用于 Clash,搭载 mihomo 内核,采用 `GEOSITE` 和 `GEOIP` 规则搭配 geosite.dat 和 geoip.dat(或 Country.mmdb)路由规则文件
声明:
- 请根据自身情况进行修改,适合自己的方案才是最好的方案,如无特殊需求,可以照搬
- 此方案适用于 ShellCrash(以 arm64 架构为例,且安装路径为 /data/ShellCrash)
- 此方案已摒弃 AdGuard Home,但拦截广告效果依然强劲
一、 生成配置文件 .yaml 文件直链
具体方法此处不再赘述,请看《生成带有自定义策略组和规则的 Clash 配置文件直链-geodata 方案》,贴一下我使用的配置:
- 注:
rules部分的geosite和geoip内容须与geodata-url中的路由规则文件相匹配
1
2
3
4
5
6
7
8
9
10
11
12
13
14
15
16
17
18
19
20
21
22
23
24
25
26
27
28
29
30
31
32
33
34
35
36
37
38
39
40
41
42
43
44
45
46
47
48
49
50
51
52
53
54
55
56
57
58
59
60
61
62
63
64
65
66
67
68
69
70
proxy-providers:
  🛫 我的机场:
    type: http
    ## 修改为你的 Clash 订阅链接
    url: "https://example.com/xxx/xxx&flag=clash"
    path: ./proxies/airport.yaml
    interval: 86400
    filter: "🇭🇰|🇹🇼|🇯🇵|🇰🇷|🇸🇬|🇺🇸"
    health-check:
      enable: true
      url: https://www.gstatic.com/generate_204
      interval: 600

## 若没有单个出站代理节点,须删除所有 `🆓 免费节点` 相关内容
proxies:
  - name: 🆓 免费节点
    type: vless
    server: example.com
    port: 443
    uuid: {uuid}
    network: ws
    tls: true
    udp: false
    sni: example.com
    client-fingerprint: chrome
    ws-opts:
      path: "/?ed=2048"
      headers:
        host: example.com

proxy-groups:
  - {name: 🚀 节点选择, type: select, proxies: [🇭🇰 香港节点, 🇹🇼 台湾节点, 🇯🇵 日本节点, 🇰🇷 韩国节点, 🇸🇬 新加坡节点, 🇺🇸 美国节点, 🆓 免费节点]}
  ## 若机场的 UDP 质量不是很好,导致某游戏无法登录或进入房间,可以添加 `disable-udp: true` 配置项解决
  - {name: 🐟 漏网之鱼, type: select, proxies: [🚀 节点选择, 🎯 全球直连]}
  - {name: 📈 网络测试, type: select, proxies: [🎯 全球直连, 🇭🇰 香港节点, 🇹🇼 台湾节点, 🇯🇵 日本节点, 🇰🇷 韩国节点, 🇸🇬 新加坡节点, 🇺🇸 美国节点, 🆓 免费节点]}
  - {name: 🤖 人工智能, type: select, proxies: [🇭🇰 香港节点, 🇹🇼 台湾节点, 🇯🇵 日本节点, 🇰🇷 韩国节点, 🇸🇬 新加坡节点, 🇺🇸 美国节点]}
  - {name: 🎮 游戏服务, type: select, proxies: [🎯 全球直连, 🚀 节点选择]}
  - {name: 🪟 微软服务, type: select, proxies: [🎯 全球直连, 🚀 节点选择]}
  - {name: 🇬 谷歌服务, type: select, proxies: [🎯 全球直连, 🚀 节点选择]}
  - {name: 🍎 苹果服务, type: select, proxies: [🎯 全球直连, 🚀 节点选择]}
  - {name: 🇨🇳 直连域名, type: select, proxies: [🎯 全球直连, 🚀 节点选择]}
  - {name: 🇨🇳 直连 IP, type: select, proxies: [🎯 全球直连, 🚀 节点选择]}
  - {name: 🪜 代理域名, type: select, proxies: [🚀 节点选择, 🎯 全球直连]}
  - {name: 📲 电报消息, type: select, proxies: [🚀 节点选择]}
  - {name: 🔒 私有网络, type: select, proxies: [🎯 全球直连]}
  - {name: 🛑 广告拦截, type: select, proxies: [REJECT]}
  - {name: 🎯 全球直连, type: select, proxies: [DIRECT]}

  - {name: 🇭🇰 香港节点, type: url-test, tolerance: 50, include-all-providers: true, filter: "🇭🇰"}
  - {name: 🇹🇼 台湾节点, type: url-test, tolerance: 50, include-all-providers: true, filter: "🇹🇼"}
  - {name: 🇯🇵 日本节点, type: url-test, tolerance: 50, include-all-providers: true, filter: "🇯🇵"}
  - {name: 🇰🇷 韩国节点, type: url-test, tolerance: 50, include-all-providers: true, filter: "🇰🇷"}
  - {name: 🇸🇬 新加坡节点, type: url-test, tolerance: 50, include-all-providers: true, filter: "🇸🇬"}
  - {name: 🇺🇸 美国节点, type: url-test, tolerance: 50, include-all-providers: true, filter: "🇺🇸"}

rules:
  - GEOSITE,private,🔒 私有网络
  - GEOSITE,ads,🛑 广告拦截
  - GEOSITE,microsoft-cn,🪟 微软服务
  - GEOSITE,apple-cn,🍎 苹果服务
  - GEOSITE,google-cn,🇬 谷歌服务
  - GEOSITE,games-cn,🎮 游戏服务
  - GEOSITE,ai,🤖 人工智能
  - GEOSITE,networktest,📈 网络测试
  - GEOSITE,proxy,🪜 代理域名
  - GEOSITE,cn,🇨🇳 直连域名
  - GEOIP,telegram,📲 电报消息,no-resolve
  - GEOIP,private,🔒 私有网络,no-resolve
  - GEOIP,cn,🇨🇳 直连 IP
  - MATCH,🐟 漏网之鱼
二、 导入 mihomo 内核
连接 SSH 后运行如下命令:
1
curl -L https://cdn.jsdelivr.net/gh/DustinWin/clash_singbox-tools@mihomo/mihomo-alpha-linux-armv8.tar.gz | tar -zx -C /tmp/ && crash
此时脚本会自动“发现可用的内核文件”,选择 1 加载,后选择 3 Clash-Meta 内核
三、 导入路由规则文件
- 注:路由规则文件和 user.yaml 都属高度定制,牵一发而动全身
连接 SSH 后运行如下命令:
1
2
3
curl -o $CRASHDIR/GeoSite.dat -L https://cdn.jsdelivr.net/gh/DustinWin/ruleset_geodata@clash/geosite.dat
curl -o $CRASHDIR/GeoIP.dat -L https://cdn.jsdelivr.net/gh/DustinWin/ruleset_geodata@clash/geoip-lite.dat
curl -o $CRASHDIR/Country.mmdb -L https://cdn.jsdelivr.net/gh/DustinWin/ruleset_geodata@clash/Country-lite.mmdb
四、 编辑 user.yaml 文件
连接 SSH 后运行 vi $CRASHDIR/yamls/user.yaml,按一下 Ins 键(Insert 键),粘贴如下内容:
1
2
3
4
5
6
7
8
9
10
11
12
13
14
15
16
17
18
19
20
21
22
23
24
25
26
27
28
29
30
mode: rule
log-level: error
allow-lan: true
unified-delay: false
tcp-concurrent: true
global-client-fingerprint: chrome
profile: {store-selected: true}

geodata-mode: true

sniffer:
  enable: true
  parse-pure-ip: true
  sniff: {HTTP: {ports: [80, 8080-8880]}, TLS: {ports: [443, 8443]}, QUIC: {ports: [443, 8443]}}
  skip-domain: ['Mijia Cloud']

hosts:
  'miwifi.com': 192.168.31.1

dns:
  enable: true
  prefer-h3: true
  ipv6: true
  listen: 0.0.0.0:1053
  fake-ip-range: 198.18.0.1/16
  enhanced-mode: fake-ip
  fake-ip-filter: ['geosite:fakeip-filter,private,cn']
  nameserver:
    - https://doh.pub/dns-query
    - https://dns.alidns.com/dns-query
按一下 Esc 键(退出键),输入英文冒号 :,继续输入 wq 并回车
五、 添加定时任务
- 连接 SSH 后运行
vi $CRASHDIR/task/task.user,按一下 Ins 键(Insert 键),粘贴如下内容:
1
2
201#curl -o /data/ShellCrash/CrashCore.tar.gz -L https://ghp.ci/https://github.com/DustinWin/clash_singbox-tools/releases/download/mihomo/mihomo-alpha-linux-armv8.tar.gz && /data/ShellCrash/start.sh restart >/dev/null 2>&1#更新mihomo内核
202#curl -o /data/ShellCrash/GeoSite.dat -L https://ghp.ci/https://github.com/DustinWin/ruleset_geodata/releases/download/clash/geosite.dat && curl -o /data/ShellCrash/GeoIP.dat -L https://ghp.ci/https://github.com/DustinWin/ruleset_geodata/releases/download/clash/geoip-lite.dat && curl -o /data/ShellCrash/Country.mmdb -L https://ghp.ci/https://github.com/DustinWin/ruleset_geodata/releases/download/clash/Country-lite.mmdb && /data/ShellCrash/start.sh restart >/dev/null 2>&1#更新geodata路由规则文件
- 按一下 Esc 键(退出键),输入英文冒号
:,继续输入wq并回车 - 执行
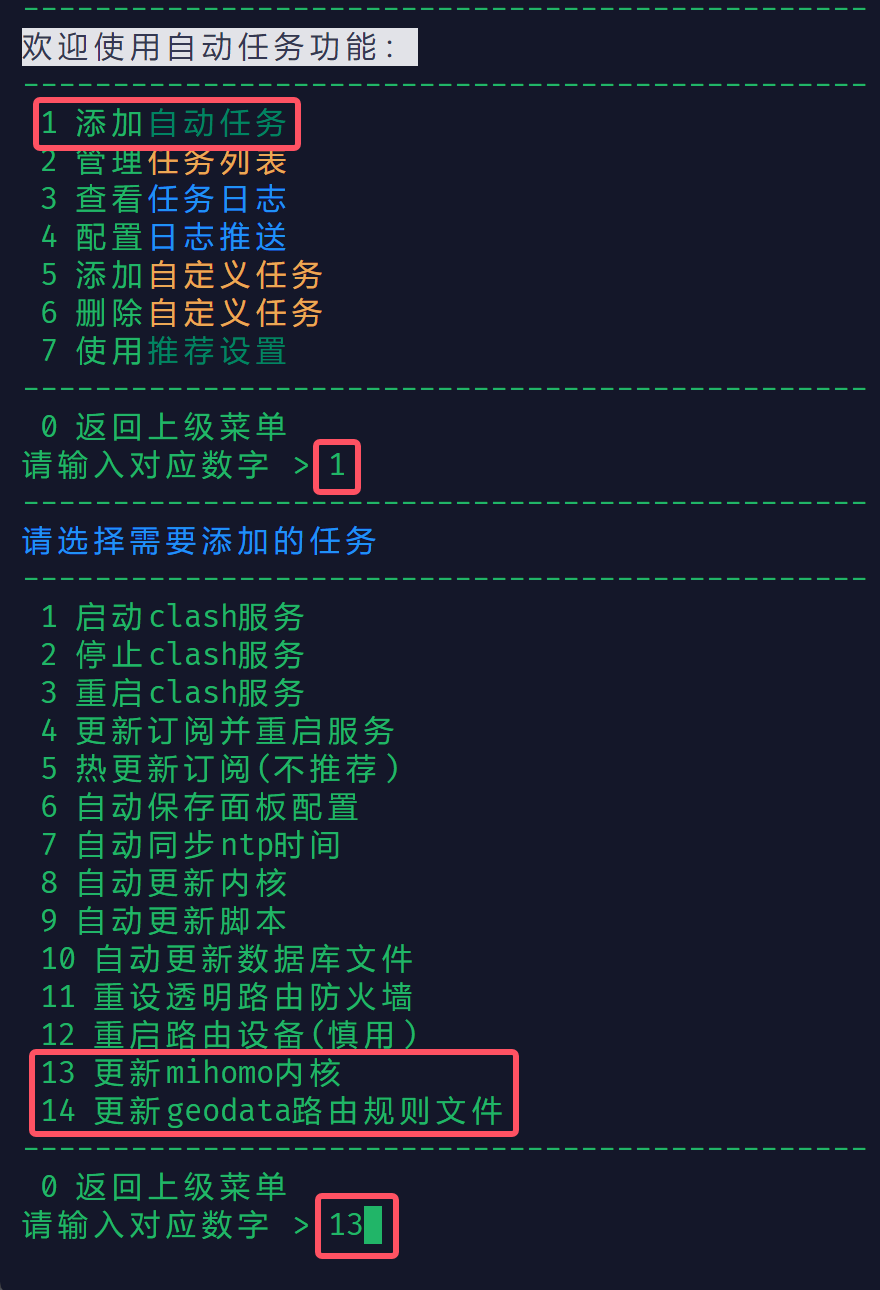
crash,进入 ShellCrash -> 5 配置自动任务 -> 1 添加自动任务,可以看到末尾就有添加的定时任务,输入对应的数字并回车后可设置执行条件
六、 设置部分
- 设置可参考《ShellCrash 搭载 mihomo 内核的配置-geodata 方案》,此处只列举配置的不同之处
进入主菜单 -> 2 内核功能设置,设置如下:
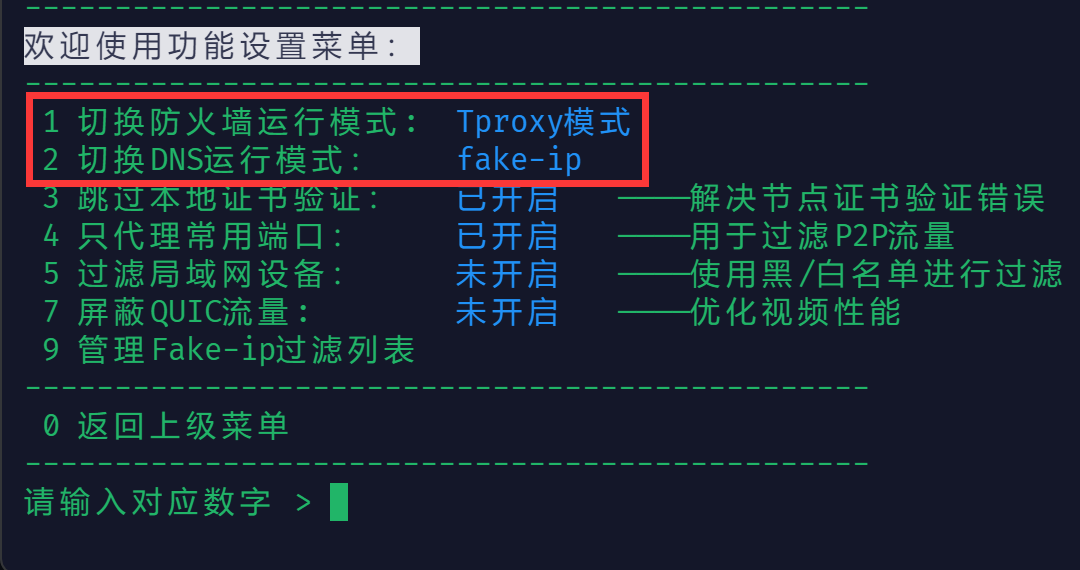
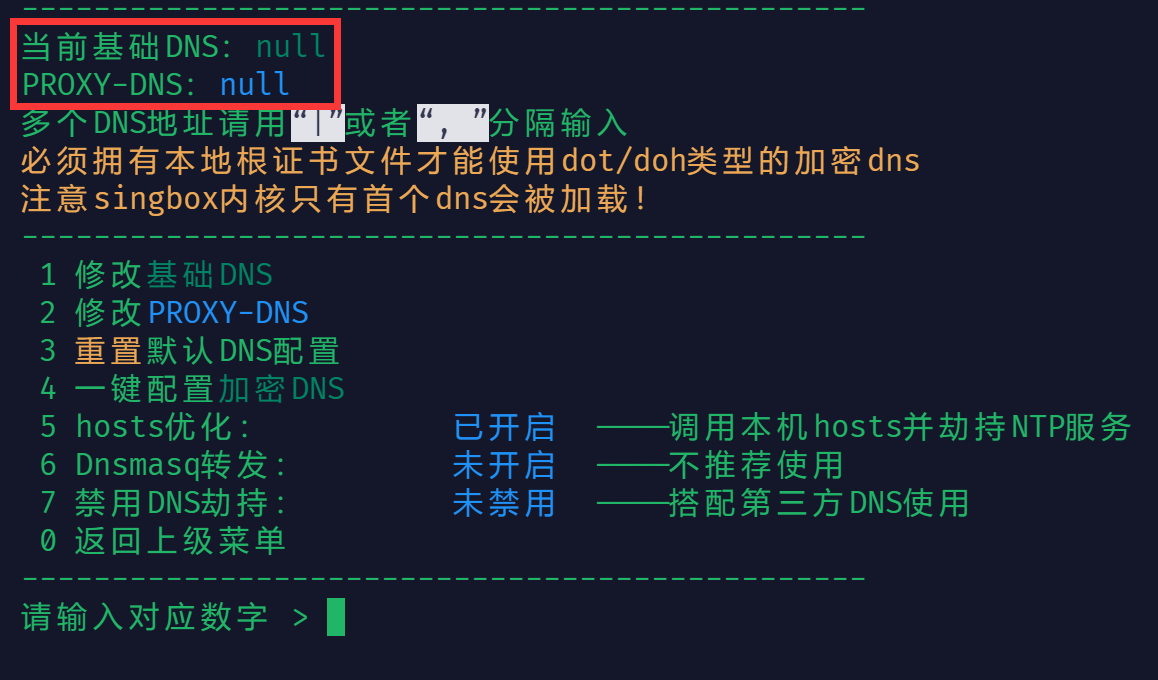
进入主菜单 -> 2 内核功能设置 -> 2 切换 DNS 运行模式 -> 4 DNS 进阶设置,设置如下:
- 进入主菜单 -> 7 内核进阶设置,不要启用 4 启用域名嗅探(因 user.yaml 文件中已添加
dns.sniffer配置项) - 进入主菜单 -> 7 内核进阶设置 -> 5 自定义端口及秘钥,设置为
9090 - 进入主菜单 -> 6 导入配置文件 -> 2 在线获取完整配置文件,粘贴第《一》步中生成的配置文件 .yaml 文件直链,启动服务即可
七、 在线 Dashboard 面板
推荐使用在线 Dashboard 面板 metacubexd,访问地址:https://metacubex.github.io/metacubexd/
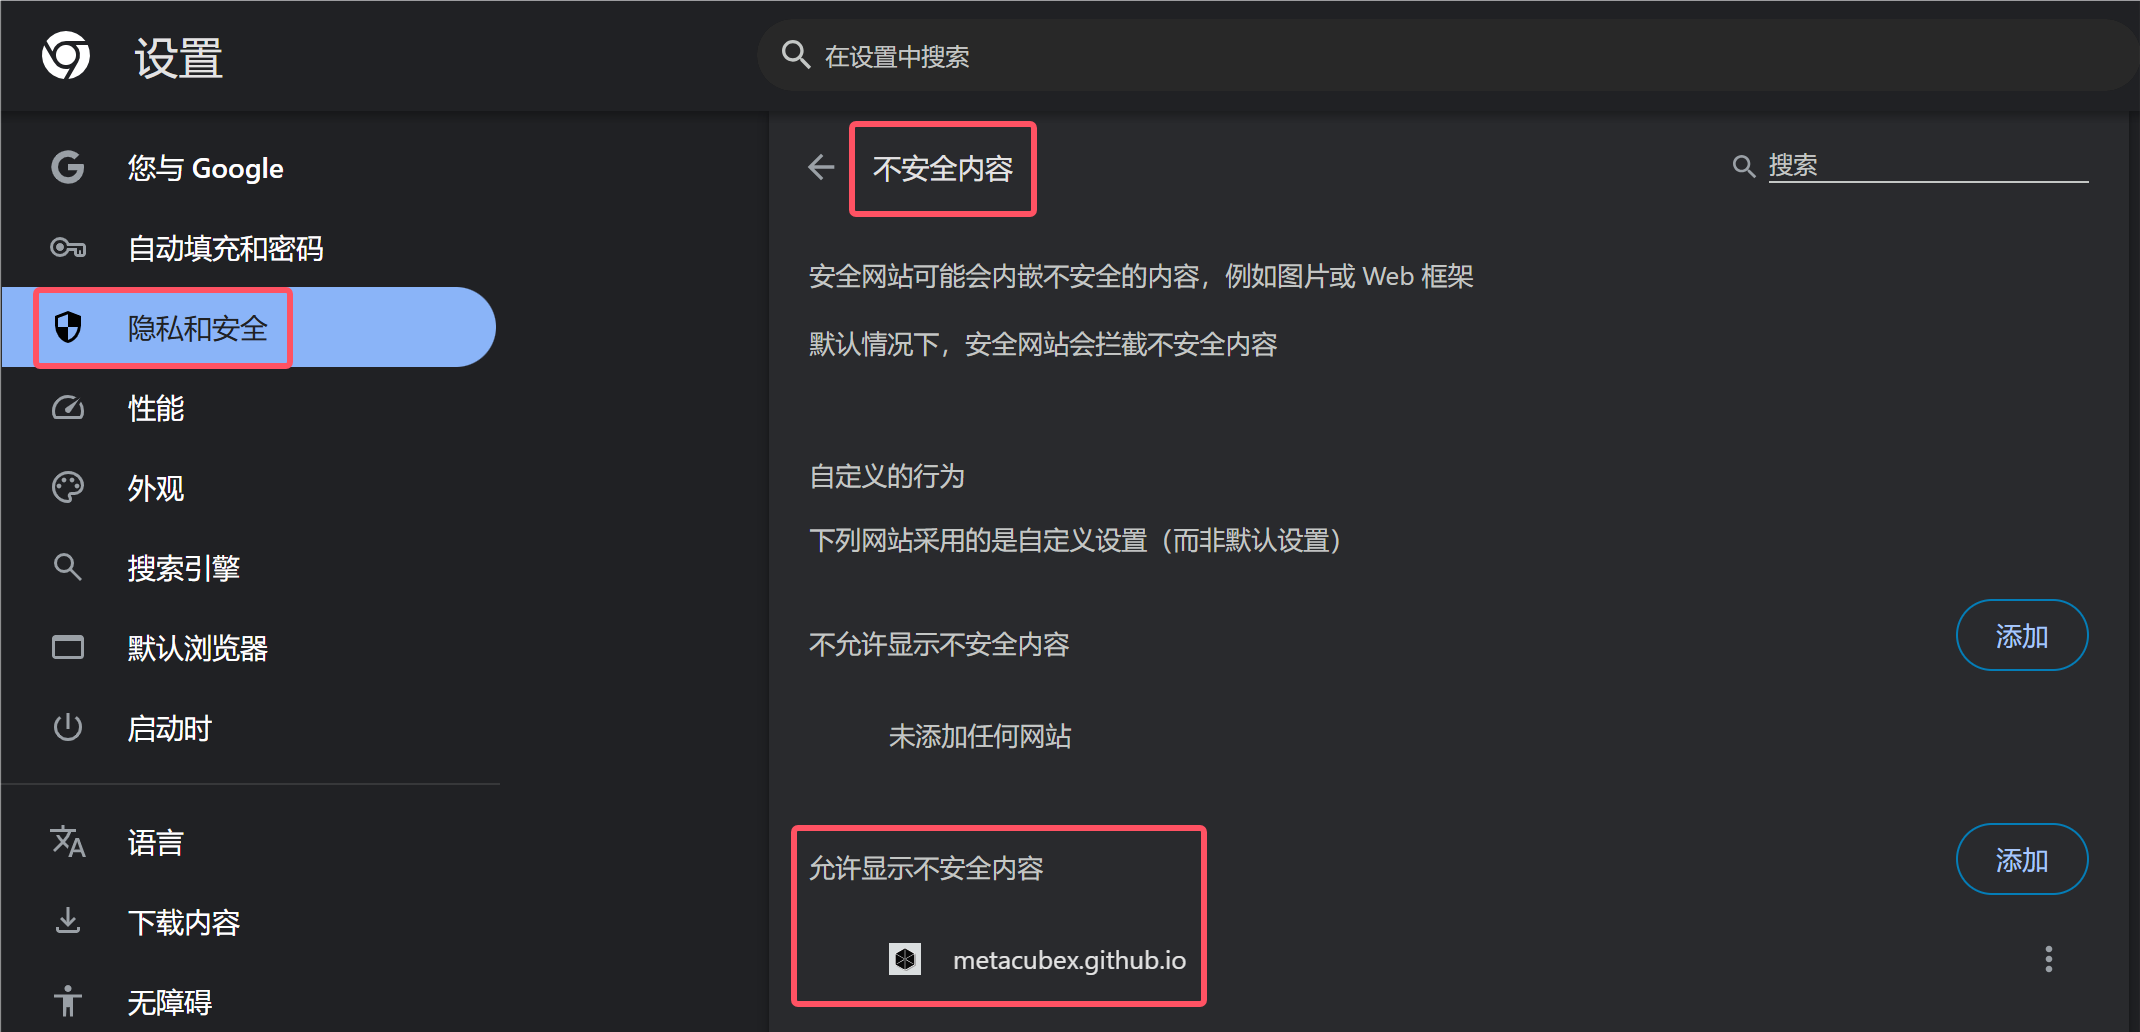
需要设置该网站“允许不安全内容”,以 Chrome 浏览器为例,进入设置 -> 隐私和安全 -> 网站设置 -> 更多内容设置 -> 不安全内容(或者直接打开
chrome://settings/content/insecureContent进行设置),在“允许显示不安全内容”内添加metacubex.github.io
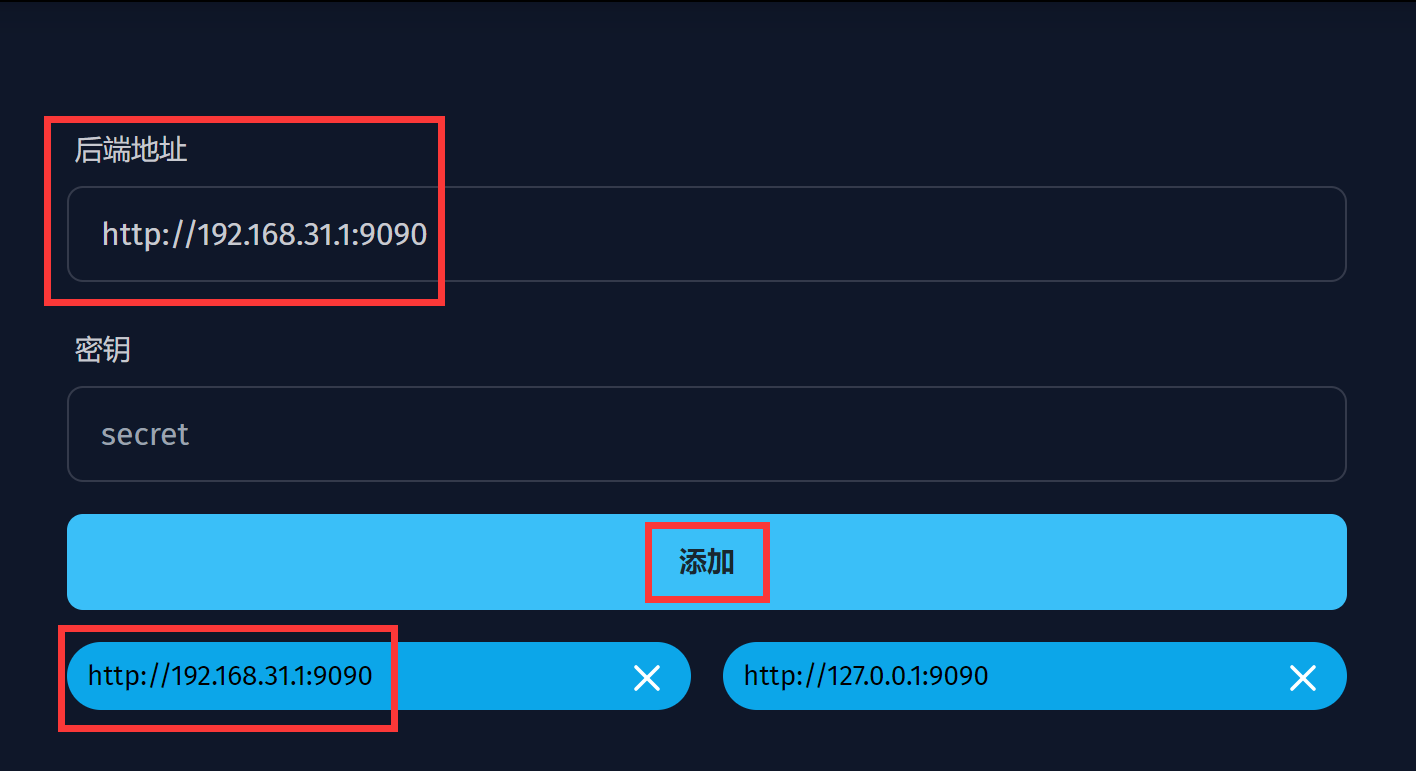
首次进入 https://metacubex.github.io/metacubexd/ 需要添加“后端地址”,输入
http://192.168.31.1:9090并点击“添加”即可访问 Dashboard 面板